Drawer Slides
You’ve definitely used a drawer slide before - at least two of them are mounted to almost any drawer that you’ve opened. Teams use these drawer slides for linear motion, often stacking them using 3D printed spacers to achieve plenty of extension.
These slides are available from a number of different vendors, and come in many varieties, so choosing the right slide can seem overwhelming. Steel drawer slides are common, but can be hard to mount, as they aren’t made to be stacked. Aluminum drawer slides, such as the MiSUMI slides, are generally the best option for teams.
We recommend the Viper Slides or MiSUMI slides for newer teams. Viper Slides are cheaper and interface better with goBILDA products, while MiSUMI slides interface better with REV products. Viper slides are also available in a complete kit
Note
When running two sets of drawer slides together, they should be mounted to face each other in order to reduce sag. This is especially important for horizontal extensions.
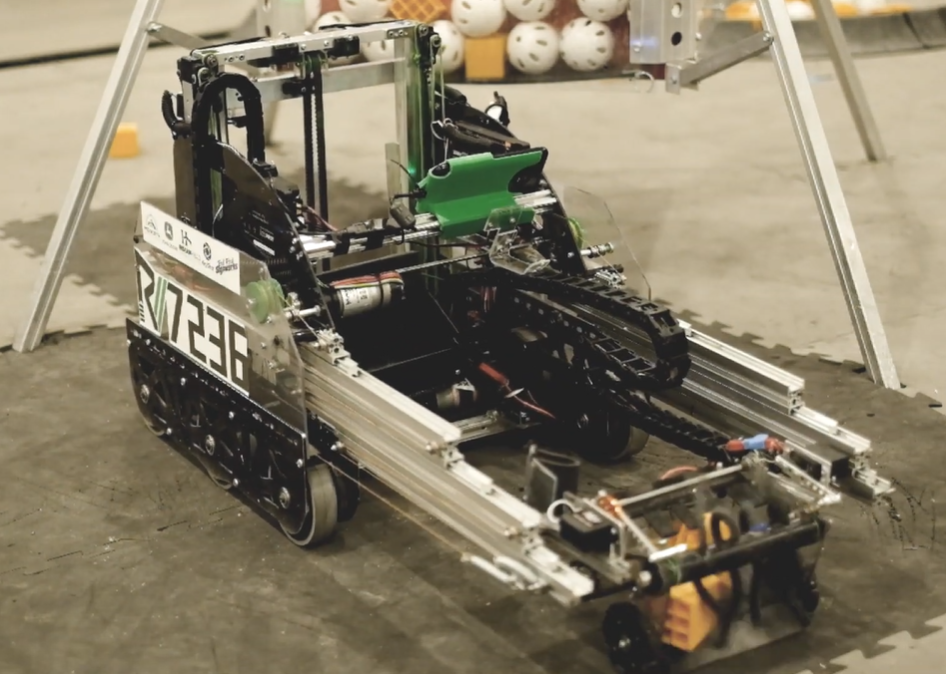
7236 Recharged Green, Rover Ruckus
On 7236’s robot, the slides are not facing each other. The sag caused by this is largely mitigated by supporting the extension at the end with omni wheels.
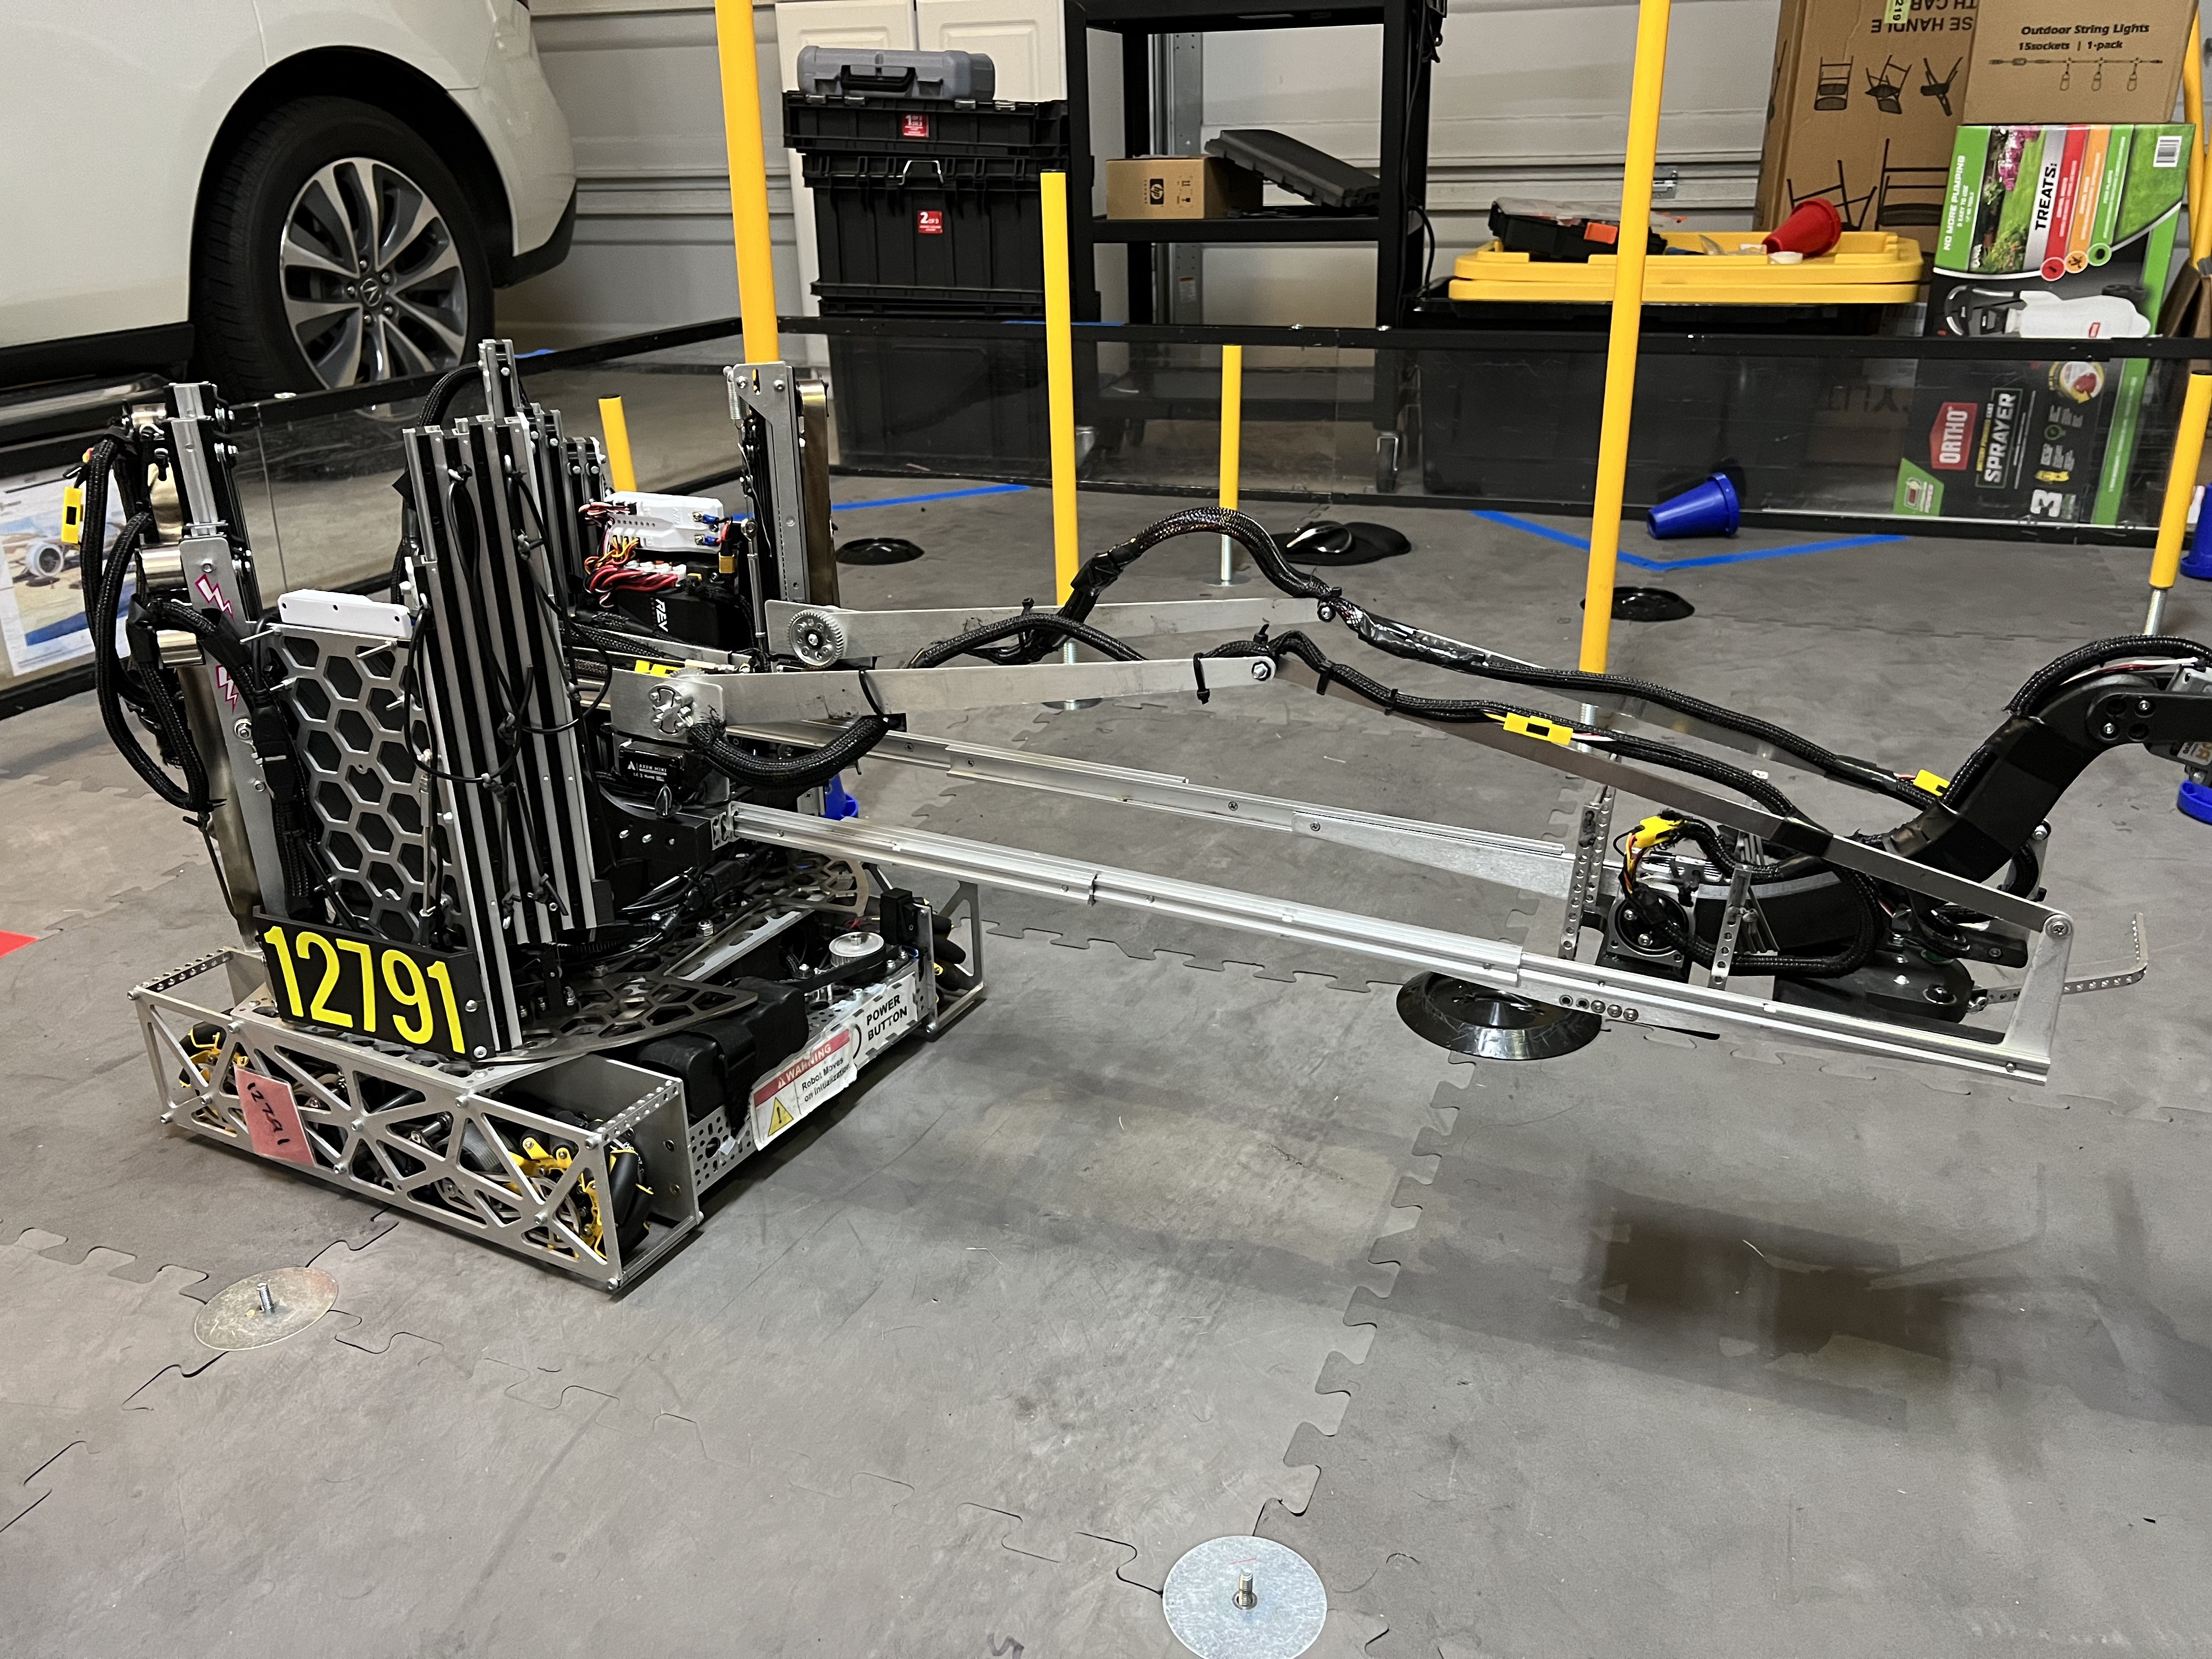
12791 Iterative Intentions, Power Play
On 12791’s robot, the slides face each other, which decreases sag in comparison to other orientations.
Listed below are the recommended drawer slides.
Steel-rolled cabinet drawer slides
Available from your local hardware store, steel slides aren’t a bad option for FTC® teams, as they are heavy-duty enough for most use cases. However, these kinds of slides are much heavier than other aluminum slide options. Furthermore, these slides are not designed to have bearings or a second slide attached to them, because they only contain mounting for a standard drawer. Thus, these slides require drilling holes in order to mount the necessary parts for linear extension.
Advantages
Commonplace at any hardware store
Not very expensive
Disadvantages
Heavier than other slide options (steel as opposed to aluminum)
Sliding is usually good but not great
Hard to adapt to building systems
3D printed spacers may be required
MiSUMI Telescopic Slide Rails
The MiSUMI slide rails are preferred by many top-tier teams because they are sturdy, very reliable, and ridiculously smooth due to the ball bearing system. MiSUMI slides are able to withstand a significant amount of load with little flex.
They are also low-profile, and have a M3 mounting pattern, meaning they are easy to attach to REV components. However, MiSUMI slides have a slightly higher price point, and it is often difficult to attach one slide to the next. An easy solution is to attach the end of one slide piece to REV extrusion, and do the same with the next slide. Then attach the REV pulley bearing on the top of the extrusion piece for the string to run through.
To save space, some teams have 3D printed an insert that goes between each slide instead of using the 15mm extrusion piece. In order to attach the slides to anything, teams will need to purchase countersunk M3 screws from McMaster-Carr. For attaching to REV extrusion, buy 6mm M3 screws with the M3 nut (not locknut) to insert inside the extrusion. As a tip, try to protect chips or sawdust from falling into the slides, as the sliding will have a noticeable difference.
MiSUMI sells two different types of slides: SAR2 and SAR3. The SAR2 is a two-piece slide, while the the SAR3 is a three-stage slide (has intermediate slider to increase the extension of the slide). Teams have used both successfully, and there isn’t neither option is clearly superior.
Teams using SAR3 slides will generally need to buy low profile M3 jam nuts from McMaster-Carr to connect the slides together. These nuts fit inside the slides with a tiny bit of clearance when tightened.
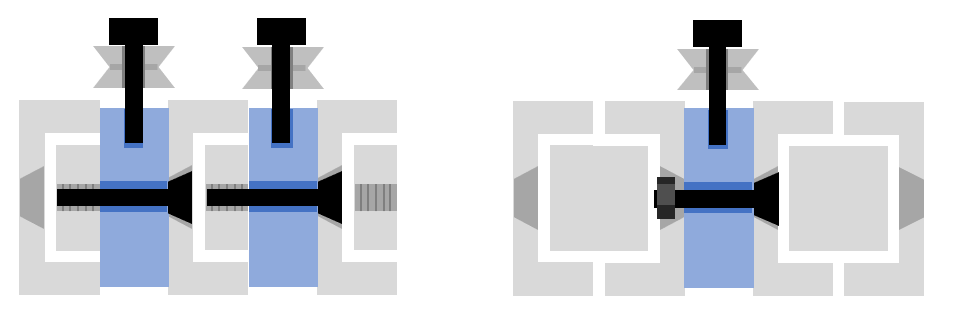
Left: cross section of a 3 stage lift using 3D printed inserts (blue) and SAR2 slides; right: cross section of a 2 stage lift using a 3D printed insert and SAR3 slides. The left approach is also used for Long Robotics slides (discussed below).
Rail length Options:
200 mm, part number SAR220 (SAR2) or SAR320 (SAR3)
300 mm, part number SAR230 (SAR2) or SAR330 (SAR3)
400 mm, part number SAR240 (SAR2) or SAR340 (SAR3)
Advantages
Best slide smoothness due to ball bearings
Very little slide flex, robust build quality
Can handle relatively heavy load use cases (within reason)
Compatible with REV 15mm extrusion system
Disadvantages
Not cheap
Tricky to adapt if not using REV
3D printed spacers may be required
Steel ball bearings wear into the aluminum rails over time, introducing play
Viper Slides
goBILDA Viper Slides are a relatively new addition to the goBilda ecosystem. They are COTS steel drawer slides that can be purchased in a kit with all the parts needed to assemble and rig them right away.
They use M4 mounting bolts, and are on the standard 8 mm goBilda pattern.
Advantages
Slide are smooth due to ball bearings
Compatible with goBILDA ecosystem
Steel slides can handle more load (can use one set of slides instead of two in many situations)
Available in a kit with everything you need to start using in one purchase
Longer stroke (more extension) then the same length misumi slide
Cheaper then misumi slides
Disadvantages
Twice as heavy per slide compared to misumi slides
Recommended to mount slides to channel to prevent bending
Long Robotics Slides
Warning
Due to the tendency of the endstops to fail, as well as inconsistent jamming issues on the slides, Long Robotics slides are no longer recommended to purchase
The Long Robotics slides are also used by teams because they are almost as smooth as MiSUMI slides due to the ball bearing system but slightly cheaper.
They utilize M4 mounting bolts, and can mount directly to goBILDA channel. They are virtually identical to the SAR2 series of MiSUMI slides.
The manufacturer website has CAD files for 3D printed inserts that go between the slides, which V-bearings are mounted to. V-bearings are available from Long Robotics. To attach slides, one will need to purchase countersunk M4 screws, which are also available from Long Robotics.
These are available in both a 300 mm rail length option and 400 mm rail length option.
Advantages
Slide are smooth due to ball bearings
Compatible with goBILDA channel
Cheaper than MiSUMI slides
Disadvantages
3D Printed spacers are almost required; while other solutions exist, 3D Printed spacers are the simplest and lowest-risk
Can be difficult to mount to kit systems which aren’t extrusion based or don’t have holes spaced at 8 mm apart
Steel ball bearings wear into the aluminum rails over time, introducing play
The endstops on the slides have been known to fail, spilling ball bearings out of the slide onto the field
Slides have been known to seize and jam on occasion